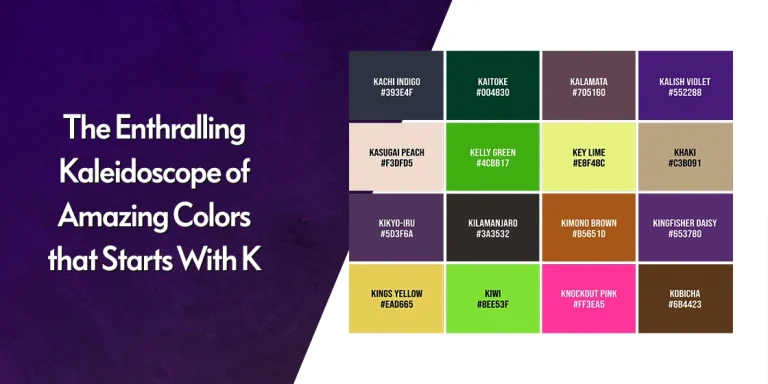
Table of Content
Understanding the Process of Making a GIF in Photoshop
Working in the field of graphic designing, you must need to master various ways to create engaging artwork. Being a designer, you must know how to make a GIF in Photoshop. It has become one of the hottest trends in graphic design industry these days. It’s unique and dynamic which is why people are preferring it to showcase their brand.
The current designing industry is not just limited to static banners or images. Instead, it has grown up higher to many advanced standards.
Besides conventional pictures, designers want to make GIF in photoshop to create a spectacular range of creatives. It looks like a video cut down in a short span of seconds, showcasing a specific type of message to the onlookers.
Surfing on the web, you must have seen various types of such GIFs on different sites. Their impact on marketing is quickly growing day by day, creating a huge trend to follow in the future.
Before understanding how to make GIFs in Photoshop, let’s first understand its importance below.
Why is GIF Important for Marketing?
Knowing the current trend of digital marketing, it is important for brands to establish themselves on online platforms. It helps them to connect with a wider audience, that too in a short period of time.
These brands have to make maximum impact on the audience by using the online channels. They need to ensure that they are using the right practices of branding in the market. This hugely depends on the graphic design services they are using to promote their brand image, which is where target-oriented GIFs come into play.
Yes, you heard that right! GIFs can play a big role in boosting a brand image.
Many companies target their customers using email and social media channels. They want to make GIFs in photoshop instead of using static images or banners at these places. That is because they offer much greater visual engagement with the audience. This is the main reason why every company wants to know how to make a GIF in Photoshop with custom images.
Importance for Social Media Platforms
Social media platforms like Facebook and Instagram are some of the top places where you can showcase your products using animated GIFs. You can use specialized social media icons in those GIFs to create better relatability. It offers a unique way of company branding, allowing marketers to attract the customers by showcasing a targeted yet dynamic image.
That is also a major reason why people want to know how to make a GIF in Photoshop for Instagram marketing posts. In the last couple of years, it has become a trend on Instagram. Many marketers have opted for dynamic GIFs to create a strong branding image for their business.
Why You Should Make a GIF in Photoshop?
Wondering about how to make a GIF in Photoshop from videos or pictures? We’ve got your answer.
Adobe Photoshop is regarded as the best graphic designing tool to create fully animated GIFs. Over the years, it has evolved into a highly advanced platform that offers various types of designing features for a range of services. You can also add fonts in Photoshop and do a variety of other things as per the requirements.
Photoshop provides a complete inbuilt setup that eases the designing of GIFs in a short span of time. That is the core reason why designers from all around the world want to know how to make GIFs in photoshop. It is easy to understand and fits compatible on all machines. This provides a quick hassle-free way to create GIFs in minutes.
If you are also looking to know about how to make GIFs in Photoshop 2020, scroll down through this article now.
In this blog, we have defined a detailed process about how you can create animated GIFs in Photoshop. Let’s take a look at its detailed process below.
How to Make a GIF in Photoshop?
Whether you are a fresher or an intermediate designer, here’s the detailed process of how to create a GIF in Photoshop CS6 or any other version.
Step 1: Import Image Files to Photoshop
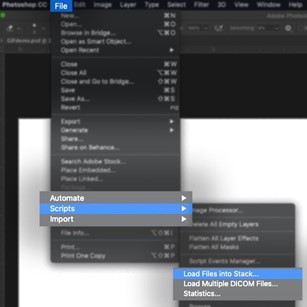
To make a GIF in photoshop, first, you need to import all the image files that are going to be converted into GIFs. To add them in bulk, go to the File > Scripts > Load Files into Stack. This is the easiest option to upload an entire range of images into Photoshop at once.
The option will ask you to select the required files from the stored folder and then press the OK button. It will then automatically prompt Photoshop to create a layer for each image you’ve selected earlier. This way you can feel ease and stay out of the manual importing process.
Meanwhile, to make GIFs from videos, go to the File > Import > Video Frames to Layers and upload your desired video similarly to the platform.
Step 2: Open the Timeline

In order to create keyframes in your GIF, you need a place where you can organize and plan them according to the given time. To do this, you have to open the timeline window which is termed as the building place of GIFs in Photoshop.
Just go to the Window > Timeline and open a panel in the lower third section of Photoshop. This timeline window is the major area where you will create an animation as per your required animation objectives.
Step 3: Convert Layers into Frames
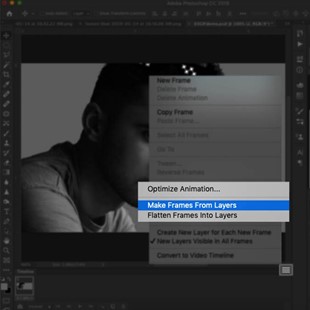
You will notice that your first frame is automatically created covering all the visible layers. Now, you have to just fill in the timeline with multiple frames to make a GIF in photoshop. This will help you to simulate the frame movement as per your own requirements.
Generally, there are two ways to convert layers into frames. The first is by importing the frames that have been already created. Whereas the second is creating the whole animation from scratch.
Generally, every designer prefers to go with the frames that are already created. Hence, we will also utilize the same technique.
Just click on the hamburger menu icon given in the upper corner. It will open a drop-down from where you’ll have to select Make Frames from Layers. This feature will automatically populate the timeline with your premade frames, giving perfect ease to your manual work.
Step 4: Duplicate Frames
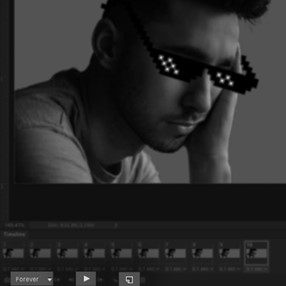
If you want to manage parts of the frames you have created above, or want to customize each of them, here is how you can duplicate them in just a few steps. Just select the last frame created in the timeline and perform your required changes. Whether you want to change the image or modify its parts a little bit, all can be done here easily.
Simply, you can make a GIF in photoshop by duplicating the same frame again and again. It is up to you to perform the required changes and reorganize the order of those duplicated frames. All of this should be done according to your final GIF alignment.
Step 5: Set Timeline Duration to make a GIF in Photoshop
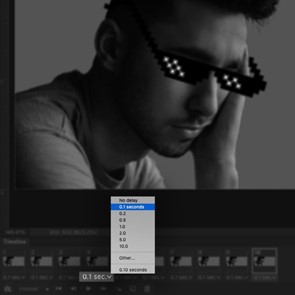
Once you have finalized the customization, it is now time to decide how long each frame will play in the GIF. It is an important part and must be taken care of smartly. This can be done by precisely seeing all the unique details of every frame.
To do this, you have to set the delay time of every frame individually. You can find the delay time setting at the bottom of every frame defined with different intervals. Just set the required delay time for each frame carefully, so that their live preview can look engaging to the people.
Step 6: Set the Animation Loop
When you are done setting the delay time for every frame, move towards the next part of setting the animation loop in GIF.
Well, you might be thinking what this loop is all about? Here’s the thing.
A looping option allows you to repeat your image more than once immediately after it ends. It automates the repetition of your image clearing out your headache to do it manually.
You can find the looping option to make a GIF in photoshop at the bottom of the timeline. Select Once or any other specific number that suits your GIF. It totally depends on your choice.
Step 7: Preview Your GIF
Now your GIF is almost created, but needs a final review. Go through all the details that you have set from step 1 and check whether they are functioning according to the given setting or not.
Many times, little issues go unnoticed while making GIFs in photoshop. From delay time to proper frame ordering, these things need a re-check at the end. This is required to ensure a complete perfect GIF outcome.
Step 8: Export Your GIF
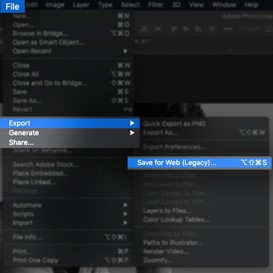
Once you are done with the overall review process, it’s now time to save your GIF. Keep in mind that saving a GIF in Photoshop is quite different from what you do conventionally.
Here, you have to go to the File > Export > Save for Web (Legacy) to save the final GIF. It will ask about the folder/drive where you want to export it, so make sure to enter it correctly.
And once the export process is completed, do remember to check how it is running outside Photoshop. It is quite a necessary process as it lets you know the final GIF is performing, both in terms of compatibility and speed.
How to Make a GIF in Photoshop: Key Features to Know About
To make a GIF in photoshop professionally, you must need to know some important points. These key things will allow you to make your GIF more optimized and website-friendly.
File Size
It is important to reduce the file size of your GIF as low as possible. Ideally, it is recommended to keep the size for any media below 1 MB. It helps the execution to remain fast. However, if it’s increasing up a bit, make sure that it doesn’t cross the 5 MB limit and always stays beneath it.
Decrease the Color Information
The file size of a GIF can increase due to high color information. It is therefore advised to reduce it to keep the final size in check.
You can decrease the color information by reducing the total colors given in the dropdown box named Colors. Make sure to see the live color changes on GIF on the other side as well. It will give you a brief idea whether that color correction is working appropriately or not.
Select sRGB
Lastly, do remember to select sRGB (Standard RGB) as your main color setting. The reason is that it has got a slightly narrower color range as compared to the general Adobe RGB. So, make sure to check its box in order to reduce the final size of the GIF.
Frequently Asked Questions
| How to make a GIF for free? There are various online portals where you can create unique GIFs for free. Some of the most popular among them are Giphy, ezgif, imgflip and a few more others. |
| What is the meaning of GIFs? GIF stands for Graphics Interchange Format. It was first introduced in 1987 by an American computer scientist named Steve Wilhite. He was called as the main brain behind the creation of this wonder. |
| How do I change the framerate of a GIF in Photoshop? To change the framerate of a GIF in Photoshop, go to the Animation Timeline menu and select the Document Settings. There, you can find the framerate settings which can be changed as per your needs. |
| How to reduce the file size of a GIF using Photoshop? You can reduce the file size of a GIF by choosing a color palette of minimum colors. For best results, it is recommended to use 2-3 colors while designing on Adobe Photoshop. |
| How to make a GIF in Photoshop without losing quality? To get the best GIF quality, just set the color mode to RGB and turn off dithering from the Save for Web dialogue. It will help you to save the GIF without losing any quality. |
Final Words
Summarizing all the above, Photoshop is a great tool to create various types of graphic design, especially GIFs. It offers tons of advanced features that help to make a GIF in photoshop as per your given requirements.
This blog has therefore thoroughly illustrated how to make a GIF in Photoshop within just 8 simple steps. Moreover, it has also defined various tips that can help you optimize the quality of GIFs. This will allow those GIFs to perform better and create larger engagement on websites
Being a fresher, it will perfectly let you know how to make a GIF in Photoshop. This will include design customization, time framing and other important attributes.
As a company, if you are looking to get custom graphic design services to improve your branding, contact us today. We will help you to design everything creatively that suits best according to the latest standards.
Logopoppin
Logopoppin is a graphic design agency that specializes in logo designing, web development, video production and advanced branding services. We love to innovate businesses with new age technologies, allowing them to improve their visual reputation.