Table of Content
Discover How to Make Your Logo Transparent In Photoshop and Other Design Tools
Ever tried placing your perfectly crafted logo on a website or marketing material, only to have it stick out like a sore thumb with that annoying white box surrounding it? You’re definitely not alone in this frustration.
Creating transparent logos is honestly one of those skills that separates amateur designers from the pros. When you master this technique, your logos flow seamlessly into any design, whether it’s a dark website header, a colorful brochure, or that Instagram post you’ve been working on.
The thing is, while making a logo transparent sounds straightforward, there are actually several different approaches you can take – and knowing which one to use when can save you hours of headaches down the road.
In this comprehensive guide, we’ll walk through everything from the basic Magic Wand technique to advanced Pen Tool methods, plus troubleshoot those weird issues that always seem to pop up at the worst moments. Let’s take a look at this logo tweaking guide from the perspective of a professional logo design agency.
Understanding Transparent Backgrounds: What Are They?
Before we dive into the actual techniques, let’s clear up some confusion about what we’re actually trying to achieve here.
What Makes a Background “Transparent”?
A transparent background means those pixels literally contain no color information – they’re empty. Think of it like looking through glass – whatever’s behind it shows through completely. This is different from a white background, which actually contains white pixel data that will block whatever’s underneath.
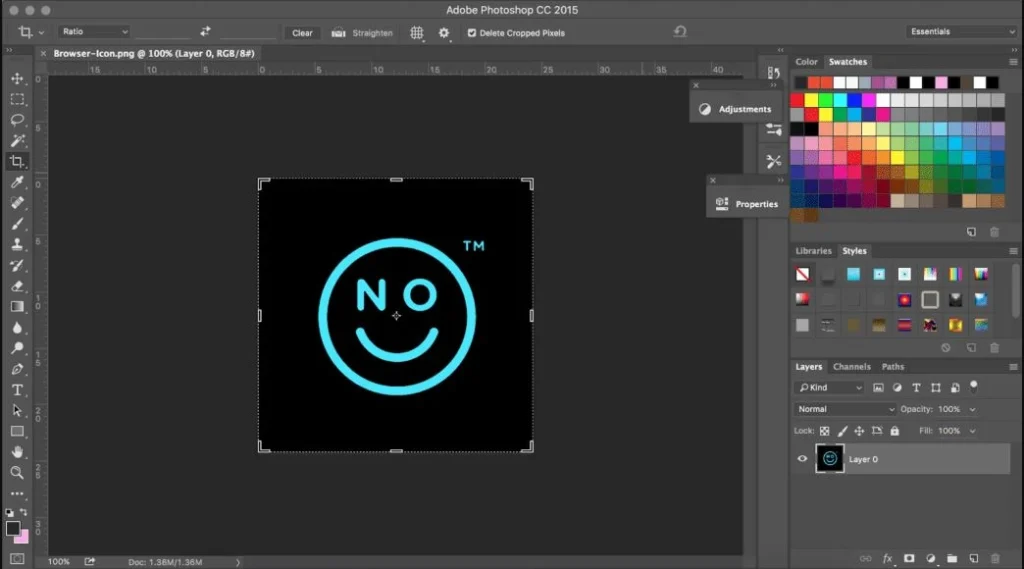
When you see that gray and white checkerboard pattern in Photoshop, that’s just how the software shows you where transparency exists. Other programs might show it differently, but that checkerboard is universal in the Adobe world.
PNG vs. Other File Formats: Why It Matters
Here’s something that trips up a lot of people: not all image formats support transparency.
- PNG (Portable Network Graphics): The gold standard for transparent images. PNG-24 gives you full transparency with no quality loss – perfect for logos. PNG-8 can also handle transparency but with some limitations on color depth.
- JPEG: Cannot, will not, absolutely does not support transparency. Ever. If you save a transparent logo as JPEG, Photoshop will fill in the transparent areas with white (or whatever background color you’ve set). This catches people off guard constantly.
- GIF: Technically supports transparency, but it’s limited to 256 colors and the transparency is either on or off – no smooth edges. Generally not recommended for modern logo work unless you’re going for that retro pixelated look.
- WebP: Google’s format that supports transparency and often produces smaller file sizes than PNG. Great for web use, but check if your intended platform supports it.
When Do You Actually Need Transparent Logos?
Understanding when to use transparent logos helps you plan your workflow better:
- Website headers and footers where the logo needs to sit on various background colors
- Social media graphics that might have different background treatments
- Print materials where the logo appears over photos or colored backgrounds
- Email signatures that need to work across different email clients
- Merchandise design where the logo goes on different colored products
- Presentations where slide backgrounds might change
Essential Steps to Prepare for Turning Your Logo Transparent
Getting your workspace and file set up correctly from the start prevents most of the frustrating issues you’ll encounter later.
Preparing Your Photoshop Workspace
Before opening your logo file, let’s optimize Photoshop for this type of work:
- Reset your workspace if things look cluttered: Window > Workspace > Reset Essentials
- Make sure your Layers panel is visible: Window > Layers (if it’s not already showing)
- Enable the Properties panel: Window > Properties (this gives you quick access to useful tools)
- Set up your History panel: Window > History (for easy undoing of mistakes)
Opening and Preparing Your Logo File
If your logo is already in Photoshop format:
- Open the file normally (File > Open)
- Check if the background layer is locked (you’ll see a little lock icon)
- Double-click the background layer to unlock it if needed
If your logo is in another format (AI, PDF, etc.):
- Use File > Open and let Photoshop rasterize it
- Choose appropriate resolution (300 DPI for print, 72 DPI for web)
- Make sure “Constrain Proportions” is checked to avoid distortion
Creating a Safety Net
This step saves you from having to start over when things go wrong:
- Duplicate your background layer immediately: Right-click the layer > Duplicate Layer
- Name it something like “Original” so you remember what it is
- Turn off visibility on this layer (click the eye icon) but keep it there
- Work on the duplicate layer, not the original
Analyzing Your Logo’s Complexity
Take a good look at your logo before choosing a removal method:
Simple logos (solid backgrounds, clear edges):
- Magic Wand or Quick Selection tools work great
- Usually can be done in under 5 minutes
Complex logos (gradients, shadows, fine details):
- Pen Tool or advanced selection methods work better
- Might take 15-30 minutes but results are cleaner
Logos with transparent elements (like text with drop shadows):
- May need combination approaches
- Consider if you want to preserve or remove the shadows
Method 1: Quick Selection for Simple Logos
The Quick Selection tool is honestly the best starting point for most logos. It’s fast, fairly accurate, and Adobe has really improved its AI capabilities in recent versions allowing you to tweak and add fonts in Photoshop.
When to Use Quick Selection
This method works best when:
- Your logo has clear, distinct edges
- The background is a solid color or simple gradient
- You want results quickly without much manual work
- The logo doesn’t have super fine details like thin lines or small text
Step-by-Step Process
Step 1: Set Up Your Selection
- Select the Quick Selection Tool from the toolbar (shortcut: W)
- In the options bar at the top, make sure “Add to Selection” is active
- Set your brush size to something reasonable – about 1/10th the width of your logo is usually good
Step 2: Make Your Initial Selection
- Click and drag across the background area you want to remove
- Don’t worry about being perfect – just get most of it
- The tool will automatically try to find edges and expand your selection
Step 3: Refine Your Selection
- Hold Alt (Windows) or Option (Mac) to switch to “Subtract from Selection” mode
- Paint over any areas that got selected but shouldn’t have been
- Release Alt/Option and paint over areas you missed
- Keep switching between add and subtract until the selection looks right
Step 4: Use Select and Mask for Fine-Tuning
- Click “Select and Mask” in the options bar (this opens a specialized workspace)
- Choose a view mode that makes it easy to see your edges (I like “On Black” or “On White”)
- Use the Refine Edge Brush to paint over any fuzzy areas like shadows or anti-aliased edges
- Adjust the Edge Detection radius if needed (usually 1-3 pixels works well)
- Click OK when you’re satisfied
Step 5: Remove the Background
- Make sure your selection is still active (you should see the “marching ants”)
- Press Delete to remove the selected background
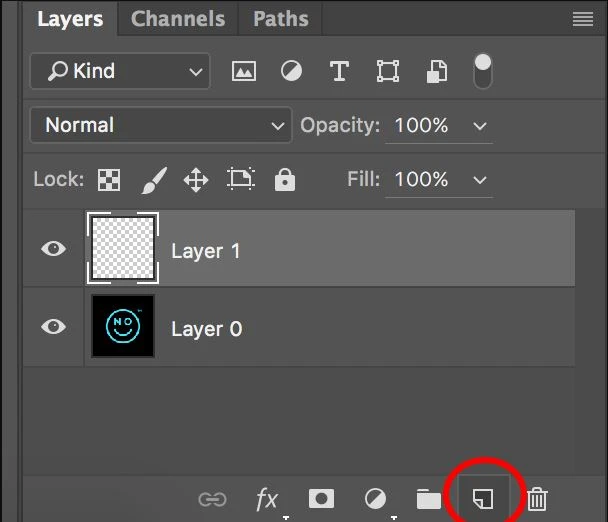
- Or create a layer mask instead by clicking the mask icon at the bottom of the Layers panel
Quick Selection Pro Tips
- Work in sections for complex backgrounds rather than trying to select everything at once
- Zoom in to at least 100% when working on detailed areas
- Use a graphics tablet if you have one – it gives much better control than a mouse
- Save your selection (Select > Save Selection) before removing the background, just in case
Method 2: Magic Wand Tool (Classic Approach)
The Magic Wand is the old reliable method that’s been around forever. While it’s not as fancy as some newer tools, it’s still incredibly effective for logos with solid color backgrounds.
Understanding Tolerance Settings
The tolerance setting is crucial for Magic Wand success. Here’s what different values do:
- 0-10: Very precise, only selects nearly identical colors
- 15-25: Good for most solid backgrounds with slight color variations
- 30-50: More forgiving, catches gradients and compression artifacts
- 50+: Very loose selection, might grab parts of your logo
Step-by-Step Magic Wand Process
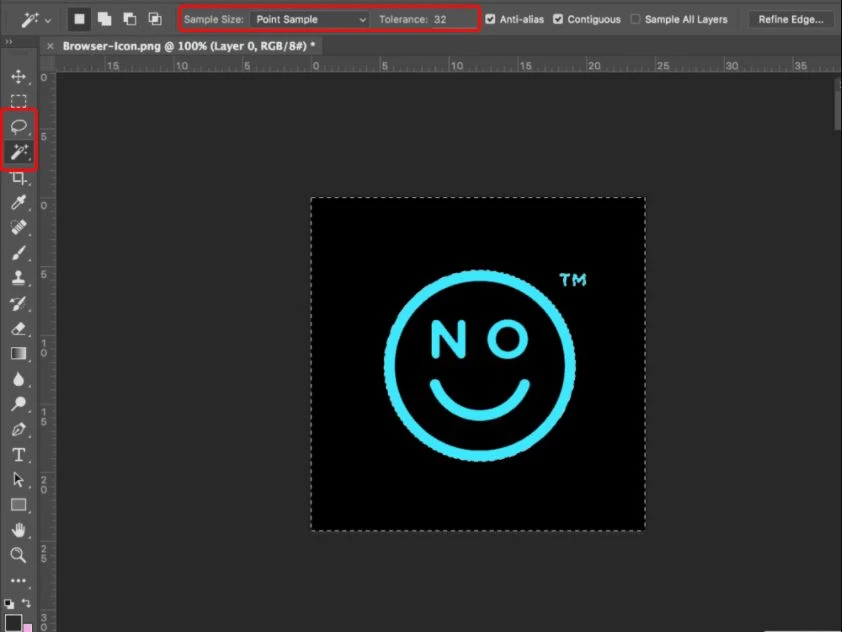
Step 1: Configure the Magic Wand
- Select the Magic Wand Tool (shortcut: W, then Shift+W to cycle to it)
- In the options bar, set Tolerance to 32 (good starting point)
- Check “Contiguous” if you only want connected areas selected
- Check “Anti-alias” for smoother edges
- Uncheck “Sample All Layers” unless you’re working with multiple layers
Step 2: Make Your Selection
- Click on the background area you want to remove
- If it doesn’t select enough, increase the tolerance and try again
- If it selects too much, decrease the tolerance
Step 3: Expand Your Selection (if needed)
- Hold Shift and click on other background areas to add them to your selection
- Hold Alt (Windows) or Option (Mac) and click to subtract areas
- Use Select > Modify > Expand or Contract to fine-tune the selection edges
Step 4: Create a New Transparent Layer
- Go to Layer > New > Layer to create a transparent layer
- Drag this new layer below your logo layer in the Layers panel
- Select your original logo layer again
Step 5: Remove the Background
- With your background selection still active, press Delete
- You should see the gray checkerboard pattern showing through
- Check the edges carefully and clean up any remaining background bits
Magic Wand Troubleshooting: Common Issues and How to Solve Them
Problem: Selection keeps missing areas
- Try increasing tolerance by 5-10 points at a time
- Use Shift+click to add missed areas manually
- Consider switching to Quick Selection tool for that section
Problem: Selection grabs parts of the logo
- Decrease tolerance
- Use Alt+click to subtract the unwanted areas
- Try clicking in a different part of the background
Problem: Edges look jagged
- Make sure “Anti-alias” is checked
- Use Select > Modify > Smooth with a 1-2 pixel radius
- Consider using Select and Mask for edge refinement
Method 3: Pen Tool for Complex Logos

The Pen Tool is where things get serious. It takes more time to master, but it gives you surgical precision that no other tool can match for your logo files. This is especially important for logos that will be used at large sizes or in professional print materials.
When the Pen Tool is Your Best Friend
You’ll want to reach for the Pen Tool when:
- Your logo has smooth curves that need to stay smooth
- The background is complex or has similar colors to your logo
- You need pixel-perfect edges for high-end applications
- Other selection tools keep grabbing parts of your logo
- You’re working with a logo that has fine text or intricate details
Understanding Paths vs. Selections
Before we dive in, let’s clarify what we’re creating. The Pen Tool creates paths – think of them like precise blueprints. These paths can then be converted into selections that we use to remove the background.
Step-by-Step Pen Tool Process
Step 1: Set Up the Pen Tool
- Select the Pen Tool (shortcut: P)
- In the options bar, make sure “Path” is selected (not Shape or Pixels)
- Turn on “Rubber Band” if you’re new to the tool – it shows you a preview of your next line
- Zoom in to at least 200% for precision work
Step 2: Start Your Path
- Click at a corner or sharp angle of your logo to place your first anchor point
- Move clockwise around your logo (this helps keep paths organized)
- For straight edges: Just click at each corner
- For curved edges: Click and drag to create curve handles
Step 3: Mastering Curves
- When you encounter a curve, click and drag in the direction the curve is going
- The length of your drag determines how pronounced the curve will be
- Hold Alt (Windows) or Option (Mac) while dragging to create asymmetrical curves
- If you mess up a curve, Ctrl+Z (Windows) or Cmd+Z (Mac) to undo the last point
Step 4: Closing Your Path
- When you get back to your starting point, you’ll see a small circle next to the pen cursor
- Click on your starting anchor point to close the path
- You should see your completed path in the Paths panel (Window > Paths if it’s not visible)
Step 5: Converting Path to Selection
- In the Paths panel, make sure your path is selected
- Right-click on the path and choose “Make Selection”
- Set Feather Radius to 0 for sharp edges, or 0.5-1 pixels for slightly softer edges
- Click OK
Step 6: Remove the Background
- Go back to your Layers panel
- Make sure your logo layer is selected
- Invert the selection (Select > Inverse) since we want to delete the background, not the logo
- Press Delete to remove the background
Pen Tool Pro Techniques
- Working with Hair or Fur: Don’t try to trace every individual hair. Create a general outline and use other tools (like Refine Edge) for the fine details.
- Dealing with Shadows: Decide early whether you want to keep shadows or not. If keeping them, include them in your path. If not, trace just the main logo elements.
- Fixing Mistakes: Use the Direct Selection Tool (A) to adjust individual anchor points after you’ve placed them. You can also use Convert Point Tool to change smooth points to corner points and vice versa.
Speed Tips:
- Use spacebar to temporarily switch to Hand Tool for panning
- Ctrl/Cmd + scroll to zoom in and out while working
- Hold Shift when placing points to constrain angles to 45-degree increments
Method 4: Advanced Selection Techniques
Sometimes the basic tools just aren’t enough. When you’re dealing with really complex logos – think intricate illustrations, logos with transparent elements, or images where the background is similar in color to the logo itself – you need to pull out the advanced techniques.
Color Range Selection
This method is fantastic when your logo and background have distinctly different color characteristics.
Step 1: Access Color Range
- Go to Select > Color Range
- Choose “Sampled Colors” from the dropdown
- Set Fuzziness to around 50 to start
Step 2: Sample Colors
- Click on the background color with the eyedropper
- Hold Shift and click on other background areas to add them to the selection
- Watch the preview window to see what’s being selected (white = selected, black = not selected)
- Adjust Fuzziness until you’re selecting most of the background but none of the logo
Step 3: Refine and Apply
- Use the “+” eyedropper to add more colors
- Use the “-“ eyedropper to subtract colors that shouldn’t be selected
- Click OK when satisfied
- Delete the selected background or create a layer mask
Channel-Based Selection
This is a more advanced technique that works by finding the channel with the best contrast between your logo and background.
Step 1: Analyze Your Channels
- Open the Channels panel (Window > Channels)
- Click through the Red, Green, and Blue channels individually
- Look for the channel where your logo appears darkest and the background appears lightest (or vice versa)
Step 2: Duplicate the Best Channel
- Right-click on the channel with the best contrast
- Choose “Duplicate Channel”
- This creates a new channel you can modify without affecting your original image
Step 3: Enhance the Contrast
- With your duplicated channel selected, go to Image > Adjustments > Levels
- Move the black and white sliders inward to increase contrast
- You want your logo to be pure black and your background to be pure white (or close to it)
- Use a soft brush with black or white paint to clean up any problem areas
Step 4: Load as Selection
- Ctrl+click (Windows) or Cmd+click (Mac) on your enhanced channel in the Channels panel
- This loads the white areas as a selection
- If your logo was the dark part, invert the selection (Select > Inverse)
- Go back to your RGB channel and delete the background
Blend Mode Masking
This technique uses layer blend modes to create transparency based on the underlying image characteristics.
Step 1: Duplicate Your Layer
- Duplicate your logo layer (Ctrl+J or Cmd+J)
- Hide the original layer for now
Step 2: Apply Blend Modes
- Try different blend modes on your duplicated layer: Multiply, Screen, Overlay, etc.
- Look for a blend mode that makes the background disappear or become very faint
- Screen often works well for dark logos on light backgrounds
- Multiply can work for light logos on dark backgrounds
Step 3: Refine with Layer Masks
- Add a layer mask to your blended layer
- Paint with black on the mask to hide areas where the blend mode isn’t working
- Paint with white to reveal areas where it is working
- This gives you precise control over where the effect applies
Method 5: AI-Powered Background Removal
Adobe has been integrating AI technology into Photoshop, and the results for automatic background removal have gotten surprisingly good. While it’s not perfect for every logo, it can be a huge time-saver for the right types of images.
Using Photoshop’s Built-in Remove Background
For Photoshop 2021 and Later:
- Select your logo layer
- In the Properties panel, look for “Quick Actions”
- Click “Remove Background”
- Photoshop will analyze your image and automatically create a mask
- Review the results and make manual adjustments if needed
Pros of AI Removal:
- Lightning fast for simple logos
- Handles hair and fur better than manual methods
- Good starting point even if you need to refine manually
- Constantly improving as Adobe updates the algorithms
Cons of AI Removal:
- Can be unpredictable with complex logos
- May remove parts of your logo if they’re similar to the background
- Less control over the specific result
- Requires newer Photoshop versions
Object Selection Tool
This is another AI-powered tool that’s really useful for logo work.
Step 1: Activate Object Selection
- Choose the Object Selection Tool from the toolbar
- In the options bar, choose “Rectangle” or “Lasso” mode
- Make sure “Enhance Edge” is checked
Step 2: Make a Rough Selection
- Draw a rectangle or lasso around your entire logo
- The AI will analyze what’s inside and try to select just the logo object
- Hold Shift and draw additional selections to add missed areas
- Hold Alt and draw to subtract incorrectly selected areas
Step 3: Refine if Needed
- Click “Select and Mask” to fine-tune the edges
- Use the Refine Edge Brush on any problem areas
- Apply the selection and remove the background
Third-Party AI Tools
If Photoshop’s built-in AI isn’t cutting it, there are several online tools that sometimes produce better results:
- Remove.bg: Upload your logo and get an instant result. Great for quick jobs, though you might need to clean up the edges, even if you make a GIF in Photoshop.
- Photoscissors: Another online tool that’s particularly good with complex backgrounds.
- Canva Background Remover: Built into Canva’s interface, works well for simple logos.
When using third-party tools, make sure you’re not violating any copyright or confidentiality agreements by uploading client logos to external services.
Saving Your Transparent Logo Properly
Getting the transparency right during the save process is just as important as creating it properly. Save it wrong, and all your hard work disappears.
Choosing the Right Format
PNG-24 (Most Common Choice)
- Supports full alpha transparency with millions of colors
- No quality loss (lossless compression)
- Larger file sizes than JPEG, but quality is perfect
- Best for: Logos going on websites, print materials, presentations
PNG-8
- Supports transparency but limited to 256 colors
- Much smaller file sizes than PNG-24
- Can look pixelated if your logo has gradients
- Best for: Simple logos where file size matters more than perfect quality
WebP
- Modern format with excellent compression and transparency support
- Smaller files than PNG while maintaining quality
- Not universally supported yet, but growing rapidly
- Best for: Modern websites where you control the platform
Photoshop Export Options
Method 1: Export As (Recommended)
- Go to File > Export > Export As
- Choose PNG from the format dropdown
- Make sure Transparency is checked
- Leave Convert to sRGB checked for web use
- Set your quality settings and click Export
Method 2: Save for Web (Legacy)
- Go to File > Export > Save for Web (Legacy)
- Choose PNG-24 for best quality with transparency
- Make sure Transparency is checked
- Uncheck “Matte” unless you want to add a background color
- Click Save
Method 3: Regular Save
- Only use this if you’re staying in Photoshop format (.PSD)
- PSD files preserve all your layer information including transparency
- Great for keeping an editable version while exporting other formats
Quality vs. File Size Considerations
For Web Use:
- PNG-24 at 72 DPI is usually sufficient
- Consider WebP if your platform supports it
- Optimize file size using tools like TinyPNG after export
For Print Use:
- PNG-24 at 300 DPI minimum
- Don’t compress the file after export
- Keep an uncompressed PSD as your master file
For Email/Social Media:
- PNG-24 at 72 DPI works well
- Keep file sizes under 1MB for email compatibility
- Test on mobile devices where possible
Testing Your Transparent Logo
Before calling it done, test your logo in its intended environment:
- Place it on different colored backgrounds to make sure the transparency is working
- Check for white fringing or halos around the edges
- View at different sizes to ensure it scales properly
- Test in the actual applications where it will be used (website, Word document, etc.)
Alternative Tools and Methods To Make Your Logo Transparent in Photoshop
While Photoshop is the industry standard, sometimes you need alternative types of graphic design tools – maybe you don’t have Photoshop, or you need something simpler for quick jobs, or you want to explore different approaches.
PowerPoint (Surprisingly Effective)
Microsoft PowerPoint actually has a decent background removal tool that many people don’t know about.
Step 1: Insert Your Logo
- Open PowerPoint and create a new slide
- Insert > Pictures and choose your logo file
- Select the logo once it’s inserted
Step 2: Remove Background
- With the logo selected, look for the “Picture Format” tab
- Click “Remove Background” on the left side
- PowerPoint will automatically detect what it thinks is the background (shown in pink/purple)
Step 3: Refine the Selection
- Use “Mark Areas to Keep” to include parts of your logo that got marked for removal
- Use “Mark Areas to Remove” to exclude parts that should be transparent
- Click “Keep Changes” when satisfied
Step 4: Save Your Result
- Right-click on the logo and choose “Save as Picture”
- Choose PNG format to preserve transparency
- Your transparent logo is now saved and ready to use
PowerPoint Pros: Free with Office, very easy to use, surprisingly accurate for simple logos
PowerPoint Cons: Limited control, can’t handle complex logos well, output quality isn’t as high as Photoshop
GIMP (Free Photoshop Alternative)
GIMP (GNU Image Manipulation Program) is a powerful, completely free alternative design tool to Photoshop.
Background Removal in GIMP:
- Open your logo in GIMP
- Right-click on the layer and select “Add Alpha Channel” (this enables transparency)
- Use the “Select by Color Tool” (similar to Magic Wand)
- Click on the background to select it
- Press Delete to remove the selected background
- Export as PNG to preserve transparency
GIMP Advantages: Free, powerful tools, supports most Photoshop features
GIMP Disadvantages: Different interface takes getting used to, some tools work differently than Photoshop
Common Online Design Tools
Canva Background Remover
- Built into Canva’s editor
- One-click background removal for most logos
- Free tier available with some limitations
- Good for: Quick jobs, social media graphics
Process:
- Upload your logo to Canva
- Select the image
- Click “Effects” then “Background Remover”
- Download the result as PNG
Remove.bg
- Specialized AI tool for background removal
- Upload and get instant results
- API available for bulk processing
- Good for: Batch processing, quick results
LunaPic
- Free online editor with transparency tools
- No signup required
- Basic but functional tools
- Good for: Occasional use, simple logos
PicMonkey
- Subscription-based online editor
- Professional-quality tools
- Good integration with other design features
- Good for: Regular design work, small businesses
Background Eraser (iOS/Android)
- Manual erasing tools for precise control
- Magic eraser for automatic selection
- Good for: Quick mobile edits, on-the-go fixes
Remove BG (iOS/Android)
- AI-powered background removal
- One-tap processing for most images
- Good for: Simple logos, instant results
Frequently Asked Questions
| Can I make any image background transparent in Photoshop? Technically yes, but success depends on the image complexity. Simple, solid backgrounds are easy. Complex backgrounds with similar colors to the main subject can be very challenging and may not produce professional results. |
| Why does my transparent logo still have a white box around it in some programs? This usually means either: 1) The file was saved in a format that doesn’t support transparency (like JPEG), 2) The program you’re using doesn’t display transparency properly, or 3) The transparency wasn’t saved correctly during export. |
| What’s the difference between PNG-8 and PNG-24 for transparent logos? PNG-24 supports millions of colors and full alpha transparency (256 levels of transparency). PNG-8 only supports 256 colors total and binary transparency (either fully transparent or fully opaque). For logos with gradients or anti-aliased edges, PNG-24 is usually better. |
| Can I edit a transparent logo after I’ve saved it? You can edit the saved PNG file, but you lose the individual layers and selection information. That’s why it’s smart to keep the original PSD file with all layers intact for future edits. |
| My logo looks pixelated after removing the background. What went wrong? This usually happens when working at too low a resolution, using too high feather settings, or applying too much sharpening. Make sure you’re working at the final size or larger, and keep feather settings minimal (0-1 pixels for crisp logos). |
| The Magic Wand tool keeps selecting parts of my logo. How do I fix this? Lower the tolerance setting, or switch to a different tool like the Pen Tool for more precision. You can also use the Alt/Option key to subtract unwanted areas from your selection. |
Conclusion
Creating transparent logos in Photoshop is one of those fundamental skills that seems simple on the surface but has surprising depth when you really dig into it. Whether you’re using the quick-and-dirty Magic Wand approach for simple logos or investing time in Pen Tool precision for complex designs, the key is matching your technique to your specific needs.
As you get more comfortable with these techniques, you’ll start developing your own workflow preferences and shortcuts. Maybe you’ll find that Color Range selection works better for your typical logo types, or perhaps you’ll become a Pen Tool wizard who can trace complex logos in minutes.
The real magic happens when you stop thinking about these as separate techniques and start combining them strategically. Use Quick Selection for the bulk removal, then switch to a small brush for detail cleanup. Start with AI removal to get 90% of the way there, then use manual techniques for the tricky bits.
Logopoppin
Logopoppin is a graphic design agency that specializes in logo designing, web development, video production and advanced branding services. We love to innovate businesses with new age technologies, allowing them to improve their visual reputation.